
Welcome to the Interactive Edge: Embedding a 360 Virtual Tour on Your Website
Ever wondered how to transform your website from just another URL to an engaging, immersive experience? It’s simpler than you might think! 360 virtual tours are your secret weapon, inviting your visitors to step inside and explore spaces as if they were there in person. This isn’t just about looking cool, it’s about making your site a place where visitors want to stay, explore, and ultimately connect with your offering.
Now, if you’re thinking, “That sounds great, but it also sounds like a tech nightmare,” I’m here to tell you it’s much easier than you expect. You don’t need to be a tech guru to bring this to life. With a few straightforward steps, I’ll show you how to embed these dynamic tours into your site, no sweat.

Whether you’re aiming to showcase stunning real estate properties, the halls of an educational institution, or the inviting layout of a retail store, a 360 virtual tour makes your site not just a stop, but a destination. Ready to get started? Let’s walk through this together, step by easy step, and make your website a truly interactive experience.
Tidbits: Did you know? Virtual tours increase user engagement by up to 40% compared to static imagery. Start your journey towards a more interactive website today!
Step 1: Choose the Right 360 Virtual Tour Software
Selecting Your 360 virtual Software
So, you’re ready to dive into creating a 360 virtual tour and showcasing it on your website? Great choice! The first order of business is picking the software that’ll help you bring your virtual visions to life. Think of this like choosing a new smartphone, you want something that fits your lifestyle, right? Well, finding the perfect virtual tour software is no different.
Let’s break down some top contenders:
– Matterport: If you’re all about that high-def clarity and need a robust toolset, Matterport could be your go-to. It’s a hit among real estate professionals and architects who really want to show off every nook and cranny of a space.
– Panoskin: New to the game? Panoskin might just be your best friend. It’s super user-friendly and plays nicely with Google Street View, making it a gem for boosting your online presence.
– 3DVista: For those who crave a little extra, like multimedia elements or VR capabilities, 3DVista steps up to the plate. It’s versatile, supporting both online and offline experiences, perfect for giving your audience a deep dive into your world.
Curious about how these tools stack up against each other? Swing by our [Guide to the Best Software for 360 Virtual Tours] () for the scoop on what might work best for your project.
What to Look for in Your Software
Choosing software isn’t just ticking boxes on a feature list; it’s about finding a match for your workflow:
– Compatibility: You’ll want something that fits seamlessly into your current website setup and plays well across all devices. After all, what good is a great tour if half your audience can’t view it properly?
– Usability: Opt for a tool that you can navigate easily. There’s nothing worse than wrestling with complex interfaces that slow down your creative flow.
– Features: Think about the bells and whistles that could enhance your tours. Floor plans? Dollhouse views? Make sure your software can deliver.
Expert Insight
Remember my first 360 virtual tour project? I went with Panoskin, largely because it let me jump right in without getting bogged down by tech. It was like finding that perfect pair of sneakers that fit right from the start, simple, effective, and just what I needed to hit the ground running. A veteran in VR once told me, “Pick tools that let you be more creative, not less.” That’s advice worth its weight in gold, especially when you’re looking to impress with less stress.
By choosing the right software, you’re setting yourself up for success right from the start. It’s not just about what the software can do; it’s about making sure it does what you need it to do, in a way that feels almost second nature. Ready to make your choice? Let’s make sure it’s a good one.
Step 2: Prepare Your 360 Virtual Tour Content
Creating Engaging 360 Content
Crafting high-quality 360 content begins with understanding the technology and environment you’re working with. If you’re shooting indoors, manage lighting to avoid glares or shadows that distort image quality. Outdoors, opt for overcast conditions which provide even lighting and minimize exposure challenges. Always use a high-resolution camera specifically designed for 360 photos, such as the Ricoh Theta or Insta360, which not only capture high-quality images but also come with software that assists in seamless image integration.
Stability is crucial; a sturdy tripod can prevent the camera shake common in handheld shots, ensuring your images are crisp and clear. Position your camera at a strategic point that offers a comprehensive view of the setting. Think about the narrative you want your tour to convey, place the camera in locations that naturally guide the viewer through the space.
Stitching Your Tour Together
After capturing your images, the next step is stitching them together to form a smooth, immersive virtual tour. This process is pivotal and can make or break the viewer’s experience. Use your chosen software to align images meticulously. For instance, 3DVista or Matterport provides advanced stitching capabilities that automate most of the process but also allow for manual corrections—a useful feature for ensuring precision in complex environments.
For those using Android devices, consider apps like Google Street View or the Cardboard Camera app, which not only facilitate image capturing but also include intuitive tools for stitching and publishing your tour directly from your phone. This is especially useful for real-time content creation and sharing, perfect for social media or quick project turnarounds.
By prioritizing quality in both capturing and stitching your images, you set the foundation for a virtual tour that engages and impresses your audience, effectively elevating your digital presence and delivering a captivating user experience.
Quick Tip: Use natural lighting for your 360 images whenever possible. It brings out the best details and colors, making your virtual tour pop on any screen!
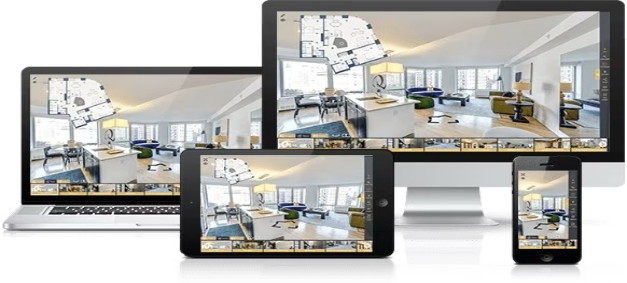
Step 3: Embedding the Tour on Your Website
Embedding Your Virtual Tour
Ready to make your website a whole lot more interactive? Embedding your 360 virtual tour is like giving your visitors a front-row seat to a virtual experience right from their screens. Let’s walk through this together, and I’ll make sure you get it right the first time.
1. Grab the Embed Code: Head over to your 360 tour software, and find the option to generate an embed code. It’s usually in the sharing or publishing section. Click on it, and you’ll see a snippet of HTML. Copy that, it’s your golden ticket!
2. Dive into Your CMS: Log into the backend of your site, where all the magic happens behind the scenes. Platforms like WordPress, Drupal, or Squarespace are common homes for such magic. Find the page or post where you want your tour to shine.
3. Paste and Position: In your page editor, switch to the HTML view or ‘Text’ editor, this keeps things neat. Now, paste your golden ticket (the HTML code) where you envision the tour fitting best on your page.
4. Preview and Perfect: Hit the preview button. How does it look? Make sure everything loads smoothly and looks just right. Try it out on different devices and browsers too, everyone deserves a great view, no matter where they’re coming from.
Keep in Mind: Virtual tours aren’t just for real estate; they’re also perfect for schools, showrooms, and event spaces to provide a firsthand experience from anywhere in the world.

Troubleshooting Tips
Got a snag? Here’s how to smooth it out:
– Invisible Tour?: Double-check that embed code. Every character counts. Also, some websites have settings that block embeds like iFrames. Make sure yours doesn’t.
– Loading Lags?: If your tour is more ‘slow-motion’ than ‘action-packed’, you might need to lighten the image files a bit or think about hooking up with a CDN to speed things up.
– Acting Weird on Mobile or Other Browsers?: Dive into the settings in your tour software, or hit up their support team. Sometimes a little tweak is all you need.
If these tweaks don’t do the trick, don’t worry. Just pop over to our Contact Page. Need more hands-on help? Our folks at Virtual Tour LLC are here for you, ready to tackle any challenge.
Embedding your virtual tour should be a breeze with these steps, and I’m here to make sure you get to enjoy the wind. Let’s make your website not just a destination but a journey!
Common FAQs for Troubleshooting 360 Virtual Tour Embedding Issues
Q1: What should I do if my 360 virtual tour isn’t working in some browsers?
A1: Browser compatibility issues, right? It’s a common snag. First, double-check that your embed code is HTML5-compliant—most browsers play nicely with that. Sometimes, browser settings might block elements like iframes, so it’s worth checking those too. And a pro tip? Always test your tour on different browsers to catch these issues early.
Q2: Why does my tour look weird on phones and how can I fix it?
A2: Ah, the joys of mobile optimization! If your tour looks off on mobile, it might be an issue with how the tour adjusts to different screen sizes. Make sure the embed code from your tour software is responsive. Sometimes, a little tweak in the CSS of your page can make all the difference, ensuring everything scales smoothly on various devices.
Q3: My tour takes forever to load. Any tips?
A3: Slow load times can really test your patience. Start by compressing your tour’s images and consider using lower-res versions for faster loading. Ever thought about a CDN? It could speed things up by hosting your content closer to your users. And here’s something else, try lazy loading, where the tour only starts loading when it’s actually in view on the webpage.
Q4: My tour keeps freezing or crashing. What should I do?
A4: That sounds frustrating! If your tour is freezing or crashing, it might be eating up too much memory, especially if you’re using high-res images or very long tours. Try optimizing your images or breaking the tour into smaller chunks. Also, check if your hosting can handle your site’s demands and keep your software updated to avoid bugs.
Q5: How can I update an embedded tour without redoing everything?
A5: Want to update your tour without the redo hassle? Opt for a dynamic embedding method. This way, you can make updates through your virtual tour platform, and they’ll automatically sync to your site without needing to mess with the original embed code. It keeps things simple and flexible!
Hope these answers help you smooth out those embedding bumps and get your virtual tours running perfectly! If you hit a wall, don’t hesitate to reach out for more personalized help.
Wrapping It Up: Your Gateway to Immersive Experiences
Ready to make your website not just seen, but explored? Embedding a 360 virtual tour is your ticket to captivating user engagement. We’ve walked through choosing the right tools, crafting stunning visuals, and seamlessly integrating them into your site. The result? A dynamic, interactive space that invites visitors to dive deeper.
Visit our 360 Virtual Tour and Google Business View pages for expert tips and in-depth guides. Transform your site toda, make it a journey, not just a destination!